Showing posts with label tutorials. Show all posts

Check out my new R2-D2 beanie!

>> Thursday, May 19, 2011


Check out this awesome R2-D2 beanie Wendi made for me! I love it so much I've been wearing it around the house even when there's no one here to see it.


It's far too time-intensive for her to sell them affordably, but Wendi is selling the pattern as an add-on to her basic beanie pattern. To learn more, click here to go to her craft blog, Shiny Happy World!

Read more...

Swell Stockings + Neato Ornaments = Easy Applique Designs

>> Wednesday, November 24, 2010

 So on Monday I released the Swell Stocking pattern. And yesterday I shared some Neato Ornaments. Today I'm going to show you what happens when you put them together.
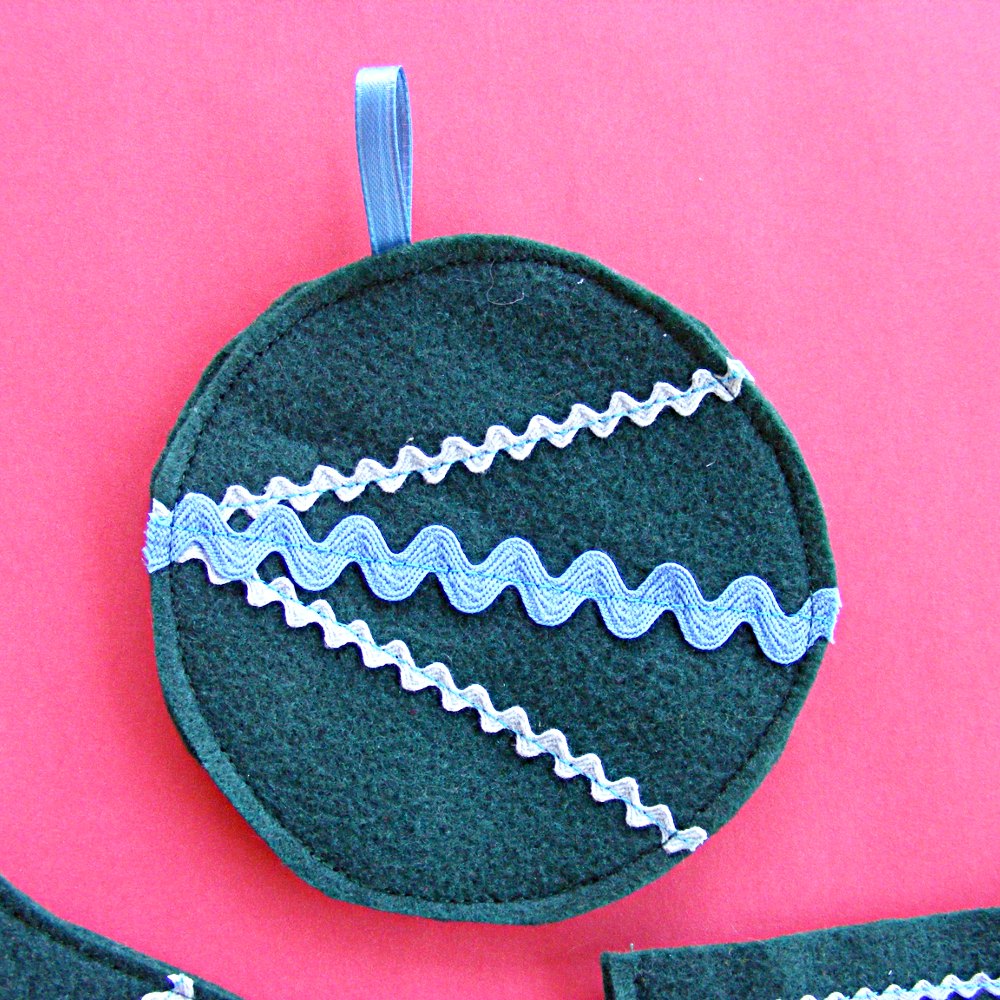
Let's start simple. Cut out an ogee shape, stitch on some rickrack and a button, stitch it to the stocking and - voila - you have a fancy ornament.
I cut out three felt trees and stitched them onto a stocking front. I added a scattering of buttons in lots of colors and sizes and - cute! - a forest of Christmas trees.
The stocking might be my favorite. I cut out one ornament-sized stocking, decorated it with a bit of rickrack, then stitched it onto the full-sized stocking leaving the top open so it acts like a pocket.
Jo went nuts when she saw me slip some lollipops into the stocking pocket for the photo shoot. "I thought that was just a decoration, but it's a pocket?! A pocket?! That is soooo cute!" Even Alan gave it props.
You can fit exactly five of the smaller ornament circles in a stack down the side of the stocking. I laid some ribbon down the center over the dots and stitched it down. The sides of the circles aren't attached and look pretty cool that way.
The smaller circles are also just the right size for these monster eyes. This guy makes me smile every time I see him.
I used the same circle template for these birds - made using designs from Ed Emberley's Picture Pie book.
Ed Emberley is a genius and everyone should have all of his books.

So there you have it. Swell Stockings + Neato Ornaments = a whole bunch of easy applique designs. Now go download them and have some fun! And if you want to just buy a finished stocking - you can find most of them (I'm still working on it) in my shop.

Psst! Come back later today and I'll introduce you to the Anywhere Bear - who can also be appliqued to a stocking! The fun never stops around here.

P.S. In 2011 I'll be launching the Shiny Happy Sewing School - offering weekly video tutorials for beginning sewists of all ages. Sign up for my newsletter or "like" Shiny Happy World on Facebook now so you don't miss a single thing! And if you know someone who wants to make "Learn to sew" one of their New Year's resolutions - please forward them the link. Thanks! And happy sewing!

Read more...

Make a Neato Ornament (or ten)

>> Tuesday, November 23, 2010


Welcome to everyone coming over here from the Whip-up post about making felt ornaments! If you tried clicking on the link to download the pattern earlier and got a message that traffic had killed it - that's been fixed now. Feel free to click away - and sorry about the delay.

I don't post much at this blog anymore, but you're welcome to join us at my Shiny Happy World for lots of sewing, embroidery and quilting patterns and tutorials. :-)

Yesterday I posted a link to a free stocking pattern (plus an absurd number of examples of what you can do with it). Today I bring you. . . . ornaments! You can download the free pattern here.

When I was a kid my sisters and I each got a new ornament every Christmas Eve. By the time I graduated from high school and moved out I had a fabulous collection of unique - and mostly handmade - ornaments. It's a great tradition and one I've been happy to carry on with Alan and Jo.

This year I designed a collection of ornaments inspired by vintage glass ornaments. You know the ones? Beautiful and oh-so-fragile. My collection is a whimsical interpretation of those traditional shapes and styles - made of felt and therefore safe from curious toddlers and climbing cats. Plus - they're easy enough for kids to make and the materials are inexpensive and easy to work with. Everyone wins!

So, do you like them? Do you want some for your very own? If so, here are your choices. . .

You can buy finished ornaments from me. I'm working on getting them They are all listed in my shop.

You can download the free pattern and make some yourself.

You can download the pattern and put your kids to work making these delightful ornaments for everyone you know.

The choice is yours. Ready for some inspiration?

My favorite shape is the ogee. Sometimes I embellish them with rickrack. . .
. . . sometimes with more felt and an embroidered asterisk for a little nod to mid-century mod.

I've also included two sizes of circles. You can embellish them with rickrack. . .
. . .or you can stack them and repeat that mod asterisk.

There's a little tree - it looks cute with some rick rack trim zig-zagged on there. I especially like this pink and white one -  it reminds me of those pink aluminum trees. Remember them?

And then there's the stocking. A little mini-stocking that can hang on your tree AND hold a special little gift or bit of candy. Don't sew the top closed - then they'd be just stocking-shaped ornaments and that would be a sad waste of stockingness.

There's way more inspiration over at the Neato Ornament Group on Flickr. If you decide to make your own you should totally take pictures and show them off over there.

And here's a little sewing tip. If you're sewing rickrack (or any other ribbon-like trim) to an ornament, cut your rickrack longer than it needs to be. Sew it on with the ends hanging over the edges of your ornament. Trim it to fit after you're done sewing. Cutting it to fit and then sewing it on and trying to keep the edges lined up is a recipe for frustration and swearing.

So - a stocking pattern yesterday and an ornament pattern today. Tomorrow we'll put them together and it will be like peanut butter and chocolate - two great tastes that taste great together.

P.S. In 2011 I'll be launching the Shiny Happy Sewing School - offering weekly video tutorials for beginning sewists of all ages. Sign up for my newsletter or "like" Shiny Happy World on Facebook now so you don't miss a single thing! And if you know someone who wants to make "Learn to sew" one of their New Year's resolutions - please forward them the link. Thanks! And happy sewing!

Read more...

How to Make a Swell Stocking

>> Monday, November 22, 2010

It's Thanksgiving week - are you ready for Christmas yet? Feeling crafty? Want to make something swell? Well I want you to make something swell - that's why I'm sharing this free pattern for a holiday stocking.

The pattern is just the basic template - the swellness comes in what you do with it. You can start simple with some rickrack or ribbon stitched across the top of the sock.
Easy peasy - and so cute!

Or you could get all daring and sew the trim on the other way - up and down. Oooh - creative!

Don't limit yourself to rickrack and ribbon. How about some fancy beaded trim?
Or a bit of a feather boa? Oooh la la!
Or maybe you want to go Raggedy Ann-style with some eyelet trim. The sky is the limit folks!
 Do you have a bunch of buttons just hanging around in jars? I think they multiply when I'm not looking and I'm always looking for something to sew them to. You can add just a few buttons in a nice neat row. . .
. . . or a kajillion scattered over the stocking all willy-nilly.
Sometimes I like to sew on buttons with the knot and the tails visible on the finished piece. I'm a rebel.

I can hear you laughing now at how many stockings I made - but this is just the tip of the iceberg folks! Tomorrow I'm going to post a free ornament pattern - and show you how you can combine the ornament and stocking pattern to come up with all kinds of new stockings. You think I'm kidding? Take a look at this gallery of swell stocking inspiration for a little sneak peek.

Crazy, eh? And - it's a public group so after you make your own swell stockings you can post them in the same group for all the world to see and be inspired by. How's that for some holiday spirit?

Make sure you come back tomorrow!

P.S. In 2011 I'll be launching the Shiny Happy Sewing School - offering weekly video tutorials for beginning sewists of all ages. Sign up for my newsletter or "like" Shiny Happy World on Facebook now so you don't miss a single thing! And if you know someone who wants to make "Learn to sew" one of their New Year's resolutions - please forward them the link. Thanks! And happy sewing!

Read more...

Tutorial - Make a Carrot Full o' Candy for Easter

>> Tuesday, March 16, 2010

It's been bunny central around here lately - making me more excited about Easter than I usually am. I wanted to make something quick and easy - something I could make a bunch of and give away at egg hunts this season. I was inspired by Holly's remake of the classic paratrooper dimestore toy (You haven't seen it? Well go check it out, for goodness's sake! It's fabulous!) and I decided to remake those carrot-shaped cellophane bags you find filled with candy at Easter. My version is made from fabric - thus hiding what kind of candy is inside. Is it M&Ms? Is it jellybeans? Oooh - the suspense! Plus it's reusable and feels so much nicer than the plastic bags. And - it's oh so easy. All you need are some scraps of fabric and a sewing machine - and this easy peasy tutorial. The link opens as a PDF. As with any PDF pattern, be sure your printer is set to print at 100% scale so it doesn't shrink the pattern.

Enjoy!

Read more...

Pockets Full of Love

>> Thursday, February 11, 2010

 
Oh my giddy aunt - it's COLD outside. Last time I checked it was 17 degrees with shrieking, howling winds. The weather says the gusts are 70 miles per hour! It's also snowing - but the wind makes it no fun to play in it. It's so cold I put a blanket over the opening to the chicken coop and turned on the incandescent light for them.
 
And then I ran back inside to stay warm and sew. I decided to make up a quickie little project that would be good for Valentine's Day - by which time it will hopefully have warmed up enough for Jo to go outside and play in the winter wonderland.

They're simple - little heart-shaped beanbags filled with rice and a little cinnamon and orange to make them smell nice. Toss them in the microwave for 30 seconds and then slip them in her pockets to keep her fingers warm. And (because if I didn't they'd be lost in a heartbeat) I sewed them to a ribbon long enough to run through the sleeves in her coat so they don't go missing - just like a classic mitten string. Easy peasy! And if you want a tutorial with step by step photos - you can download one here. Happy Valentine's Day!

Jo loves the flaming fabric for these.

Read more...

Vintage Children's Books: Tiny Tins

>> Friday, December 5, 2008

I love to make things out of the still-good pages of damaged children's books. I've been making some necklaces lately to give as gifts (tutorial to come this weekend) and I wanted to come up with some cute matching packaging. And here you have it! These were so much fun to do that I made lots of extras - including some for everyday occasions.

They're great for holding candy too.
And I was absurdly excited when I found out they were just the right size for a gift card.
Want to make your own? They're really easy. I used Altoids-sized hinged tins (you can buy them here), spray adhesive (I use this), and some great papers. You can use scraps of holiday wrap, pretty scrapbook papers, your child's art - anything really. If you want to use children's book pages you can get assorted packs in my shop.

You can buy whole books yourself, of course. But then you end up with a ton of art from a particular book and, unless you're doing themed party favors and want them all to match, you're going to have a lot of leftovers. And you'll want some variety so you'll likely end up with a whole shelf of badly damaged children's books - not that I'm speaking from experience or anything.

I have two assortments available in my shop - one everyday. . .and one holiday. . .
Each assortment will have a nice variety of pages - some famous characters, some not famous but nice vintage style. No two pages will come from the same book so you'll get a good mix.

I'll be posting lots of fun things you can make with these papers in the coming months. Wait until you see my kitchen canisters!

Have fun!

Read more...

Tutorial: Easy Felt Ornaments

>> Thursday, December 4, 2008


Here's a fun and easy felt ornament you can make for the holidays. It takes less than an hour, you can use up old scraps, and kids can make them too.
The only stitch it uses is whipstitch. If you've never done that before there's a tutorial here.
Have fun!

Read more...

Tutorial - How to Split Stitch

>> Friday, November 28, 2008


Another tutorial? Already? Yes - that's right folks. I have big plans to get a kit listed by tomorrow too - and then it's at least one free pattern or tutorial every week until the new year when I launch my new and improved website. Alan asked if my intern was going to do all this. Since my intern is imaginary it's unlikely that she'll be very helpful. I'm hoping that putting this goal out there in writing means I actually get it done.

So here's the new tutorial. This time I'm showing you how to sew a split stitch - my favorite stitch for embroidering lines. I used it on this dress.
I like that it has some texture to it - when it's done it looks kind of like a little braid on the surface of the fabric. Nice. It's also substantial enough to cover any marking lines on the fabric.
One note - I'm not using an embroidery hoop in the tutorial. That's because I'm working on felt and felt is sturdy enough not to need a hoop - just be careful not to draw your stitches too tight. If you're doing this stitch on regular fabric - use a hoop.

If you'd rather view the tutorial on Flickr the link is here.

Read more...

Tutorial - How To Whipstitch

>> Thursday, November 27, 2008


New Note! In 2011 I'll be launching the Shiny Happy Sewing School - offering weekly video tutorials for beginning sewists of all ages. Sign up for my newsletter or "like" Shiny Happy World on Facebook now so you don't miss a single thing! And if you know someone who wants to make "Learn to sew" one of their New Year's resolutions - please forward them the link. Thanks! And happy sewing!

Now back to my original post. . .
Ever since I saw the niftiness of this tutorial over at Betz White's blog I've been wanting to use the same service for mine. No more scrolling through endless tutorial posts!

We've all been under the weather here at Gratz Industries so I've been doing lots of hand sewing in front of the fire and you will be seeing several felt tutorials, patterns, and even kits over the next couple of days. Without further ado - here's my first fancy-schmancy tutorial - How to Whipstitch! This is my favorite stitch for joining layers of felt. Some people don't like it because your stitches are straight on one side of the project and slanted on the other - but that's just fine with me for most things. If you want straight stitches on both sides you need to use the more-fussy blanket stitch - tutorial coming soon.

Please let me know if you have any trouble viewing the slideshow. If you want to see it bigger you can also view it here on Flickr. Enjoy!

Read more...

Tutorial - The Sarah Apron

>> Tuesday, May 6, 2008


New Note! In 2011 I'll be launching the Shiny Happy Sewing School - offering weekly video tutorials for beginning sewists of all ages. Sign up for my newsletter or "like" Shiny Happy World on Facebook now so you don't miss a single thing! And if you know someone who wants to make "Learn to sew" one of their New Year's resolutions - please forward them the link. Thanks! And happy sewing!

Now back to the original post. . .
I've been making lots of aprons lately and I finally got the patterns listed. If you want to make your own, you can find my patterns here.

I love the three I designed for the pattern, but I decided to make a girl-sized one to match the apron I made for Kit. I wanted to design something a little simpler than the Madeline apron - something that would be easier to make. It's so easy that it's the perfect beginner's project - here's how. . .

Start out by cutting out all the pieces. Cut one rectangle 22" wide by 12" high. That's the skirt part of the apron. For the pockets, cut two 5" x 5" squares. For the waistband cut enough pieces to make a strip 3" wide and 66" long. I'll show you how to join the strips together later.

First we'll start with prepping the pockets. Turn in the sides and press them down. It doesn't really matter what your seam allowance is - just do whatever feels easy for you. My eyeball seams always seem to measure 3/8". It should look like this.
Now turn the bottom edge up the same way and press. It should look like this.

You'll want a more clean edge for the top, so turn that top edge in and press, then turn it in again and press. It should look like this.

Stitch down the top edge pretty close to the folded edge.

Repeat for the second pocket. Now you need to hem the sides and bottom of the apron. Use the same method that you used on the top of the pocket, turn the hem under, press, turn it under again and press again. Stitch down both sides, and then repeat the turning, pressing and stitching for the bottom hem. I didn't take pictures of this part, but it's pretty straightforward.

Now you're going to place the pockets on the skirt of the apron. Line things up so that the top right corner of the finished pocket is 5" down from the top edge of the skirt, and 2 1/2" in from the right edge of the skirt. See the picture below - the gridlines on the cutting mat and the ruler are all 1 inch.
Pin the pocket in place and repeat for the other side. Stitch each pocket down one side, across the bottom, and up the other side of the pocket.

Now it's time to gather the top of the apron. In my pattern I show how to gather using basting stitches, but I recently acquired a gathering foot and it has changed my life. Seriously. This thing cost about $20 and I can't believe how long I've been sewing without one. You snap the foot on, adjust the stitch length and the tension, and run the fabric through. It comes out all gathered and nice - and in no time flat. This foot should come standard with every machine. I can't believe I made this without one. Look how pretty!

Gather the top of the skirt until it's about 12" across. That's an approximation - this isn't rocket science so don't go ripping out stitches (or your hair) if you end up an inch shorter or longer.

Now you need to make the waistband. I like to use a double-fold waistband - it has a little extra body without having to add interfacing or anything like that. First you need to join your strips together into one long strip. Do this on the diagonal so that you don't get annoying lumps where all your seam allowances pile up. Lay out two strips so that they make a corner. Stitch across on the diagonal.

Cut away the extra fabric.

And press the seam allowance open.

Repeat, joining as many pieces as you need to get a strip roughly 66" long. Again - close to 66" is good. Now fold the strip in half the long way, right sides out, and press.

Open it back up and fold one side in to the crease in the middle. Press.

Now fold the other side in to the crease in the middle and press.

Now attach the waistband to the apron by folding the two sides around the top (gathered) part of the skirt. It's easiest if you fold the waistband in half to mark the center, line that center mark up with the center of the apron and then work your way out from the middle.

Pin the waistband strip in place.

You're almost done. Time to stitch the waistband on. To get a nice clean finish on the end of the tie, open it back up and fold in a bit at the top.

Refold the strip along the crease and stitch it down. Sew down the short end first.

When you get to the corner - stop, turn your needle down so it's in the fabric, raise the presser foot and turn the fabric 1/4 turn so that you can sew down the long way. Don't forget to lower the presser foot before you start sewing again or you'll get a nasty mess of thread under your project.

Keep sewing down the whole length of the waistband. Don't sew too close to the edge - if you do that you may not catch the folded edge on the back side. I like to sew about 1/8" from the folded edge - that's the point on my presser foot where it goes from clear to metal so it's a good, easy mark to follow.

Pivot again at the end of the waistband and sew up the last short edge. Don't forget to fold down the short edge like you did at the start of the waistband.

You could stop at this point and you'd have a finished apron, but I like to add an extra feature when I make aprons for children. I know mine's not the only kid out there who likes to do things herself. Even after they learn how to tie a bow things that tie in the back can be really frustrating - so I add a bit of velcro at one hip. Nifty! Here's how. First you have to cut your new, nicely finished waistband. Make the cut about 1/2" from the edge of the apron.

Cut a piece of velcro about 1 1/2" long. Fold that little 1/2" tab you left to the FRONT of the apron.

Lay the soft side of the velcro right over the tab (it will cover the raw edge) and stitch it down all the way around the edges.

Fold back a little bit on the cut end of the waistband and stitch the prickly side of the velcro over that.
Put them back together and NOW you have a finished apron. Tie it on to fit and after that your girl can put it on and take it off all by herself.

Perfect for keeping little friends close by.

Read more...
Related Posts with Thumbnails
Read Alan's archived newsletters here.

Blog Archive

Swell Stuff

My Etsy Favorites

  © Blogger template Simple n' Sweet by Ourblogtemplates.com 2009

Back to TOP