Showing posts with label Rural Living. Show all posts

Our new woodshed

>> Wednesday, November 3, 2010


Our plans to install our wood stove this past weekend were derailed when we discovered (surprise surprise) that we didn't have all the parts we needed. Some are still on order at Lowe's, and others we'll have to buy in store, but that won't be until this coming Friday. In the meantime, we decided to get a woodshed built!
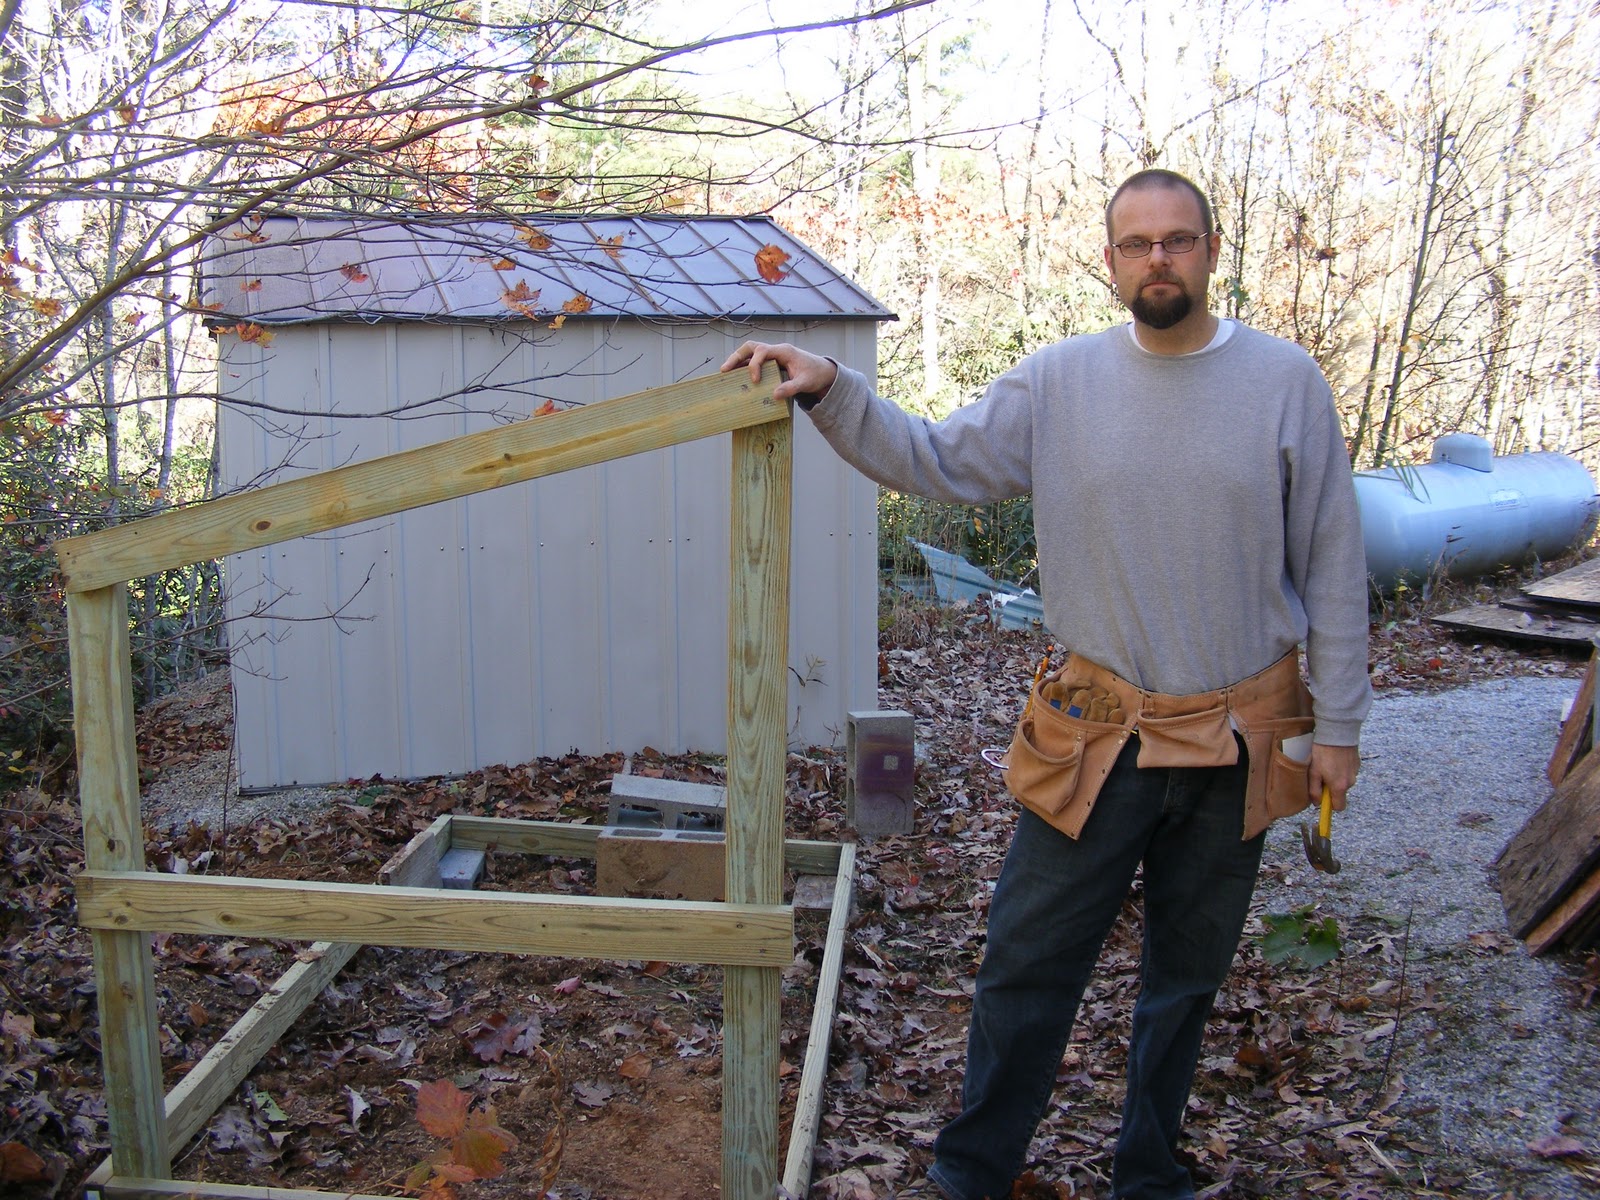

We bought a few pieces of pressure-treated wood for this project, but we tried to use up a lot of scrap from other projects on this one, particularly as it's hidden behind the house and doesn't need to look pretty.


A cord of wood, according to The Internet, is four feet by four feet by eight feet of wood, so those are the dimensions we used, kicking the front up an extra foot for accessibility--and to allow snow to slide off the roof in the winter.


I love any excuse to wear my tool belt...


Our outer frame is finished! Now to add side panels, a roof, and a floor.


But first, we added side supports for the three stacks of wood that will fit inside. We used more scrap wood here, so the pieces are uneven and mismatched.


While Wendi and I covered the walls with old flooring pieces left over from the construction of our house, Jo was charged with shoveling sand from our leftover sand pile for the base. She ended up playing more than shoveling, but she helped out.


The leftover floor boards were pretty crappy, but still in good enough shape to be serviceable. The best part: they were free! (Or, well, we had long since paid for them already.)


On top of the sand we stacked all the cinder blocks that were--again--left over from the construction of our house.


And the roof too was recycled! These are layered scrap pieces from the roof of our new house.


We had wood delivered the next day. We bought a cord, but the logs were cut to 18" lengths, not sixteen, so we didn't get them to fit three stacks deep as perfectly as we had planned...


They stick out a bit, but we'll have the half a stack piled on the front burned down in no time, and perhaps next time we'll find a supplier with 16" logs instead. 


Moving a cord of wood one wheel barrow at a time from the other side of the house was not a lot of fun, but until the mobile home gets sold and moved, we won't be able to get a pick-up truck back to the wood shed. When the mobile home is gone, we should be able to get the wood a lot closer for loading.


We also bought a nifty little metal rack at our local Ace Hardware for our porch. It holds about a half of the front stack from the woodshed. We'll keep this filled up from the woodshed through the winter so we can grab more dry wood and dash back inside without having to go all the way around to the woodshed, and in the warmer months we'll take it apart and stow it in the storage shed.

Now we just need to get that wood stove installed! In the meantime, at least I have a woodshed to take Jo out behind...

Read more...

We have a wood stove!

>> Friday, October 22, 2010


Our wood stove was delivered this morning!


Jo got a box.

Read more...
New pottery from the Spruce Pine Potters Market

>> Wednesday, October 13, 2010


We're very lucky to live in an area with so many world-class potters! These folks sell their beautiful work throughout the country and around the world, so it's a treat to attend the Spruce Pine Potters Market each year and see all that work collected in our humble little town. We've made a commitment to replacing most of our mass-produced dishes with original work over time, and we acquired some great pieces this time around!


A bowl by Shawn Ireland, who lives just down the road from us.


A cup by Mark Peters, whose daughter was in the same class as Jo at Spruce Pine Montessori.


Two plates, above and below, by Courtney Martin, a local potter we've come to know really well. We love her work! I use a pitcher she made at my desk, and we have another plate and bowl of hers we acquired during the Toe River Arts Council Studio Tour last year. (We also own a glass bowl by her partner John Geci.)


A ceramic strainer. Wendi loves her red and purple metal strainers, but the paint coating is coming off of them, and this looked like it would be perfect for rinsing fruits and vegetables. It's done by a potter who teaches the dual credit class at Penland, which lets Mitchell County High School students take art classes that earn them academic credit both in high school and at the local Mayland Community College--but I can't remember her name, and Wendi's not here for me to ask!


And one last piece, by our "house potter" Michael Kline. We own lots of pieces by Michael, and we love his work so much we'll certainly acquire more. This one has a richer, darker color to it than some of the other pieces we own, which makes for a nice contrast.

Read more...

Weird chicken trivia

>> Monday, October 4, 2010


Mental Floss recently did a post with weird facts about chickens and, since we're nominally chicken wranglers, I thought I'd pass along some of the strangest chicken facts:

3. What is pasty butt, and how do I prevent it?

Chickens have a multipurpose hole for excrement, eggs, and mating called the cloacal vent. If this hole becomes clogged with excrement—a condition known as pasty butt—a young chicken can get backed up and die. Without a mother hen to clean them, baby chicks raised by humans are particularly susceptible to pasty butt. That’s why chicken keepers must be vigilant in monitoring and cleaning their brood’s bottoms. 

Yikes.

6. How do I hypnotize a chicken?

The chicken mind is an easy thing to control, and chicken handlers have found several ways of hypnotizing the birds. Here are three surefire ways to make a chicken very, very sleepy:

• Hold a chicken’s head under its wing and gently rock its body.

• Hold a chicken upside down and wiggle a finger in circles around its beak.

• Stare intently into a chicken’s eyes.

Generally, they’ll stay spellbound for several minutes, or even hours, until a loud noise snaps them out of their trance. Scientists think this state is a form of tonic immobility, a defense mechanism in which animals “play dead” in order to shake off a predator. Hypnotized chickens can be pretty useful, though. Former Vice President Al Gore recalls using them as doorstops during his childhood days on his family’s farm.

Ten Provocative Questions About Raising Chickens...Answered!

Read more...

A Penland Fourth of July

>> Friday, July 9, 2010


Fourth of July celebrations at Penland School of Crafts are always a bit out of the ordinary, and this year was no exception.


The annual Penland Fourth of July parade began with the clay studio doing a  rousing rendition of Stars and Stripes forever, mostly hummed, but with an accordion accompaniment.


The wood studio was up next, with a a high-flying tribute to their craft.


We particularly liked the bloody saw blade and severed finger, a badge of the wood studio if ever there was one. (The blade actually spun. That's what the strings are for.) Be careful there, guys!


A collection of Jo's friends get pulled along by Pablo, who's a world-class glass-blower. Jo usually finds a way into these kinds of floats, whether she was meant to be there or not, but this year seemed content to run around with the other kids on the sand volleyball court.


Our friends Michael and Stacey throw candy out to the crowd. Their costumes--they're s'mores--were designed and created by their daughters Lillian and Evelyn, who are down there somewhere. We never do get there early enough to get a front row seat.


The encaustic class. Not sure what that means, exactly, but I think it's a way of working with metals. (Wendi will have to chime in here.) Theirs had something to do with bees, or getting buzzed. Wendi chiming in here - encaustics is painting with melted wax that has pigment in it - it's a lovely texture and the studio smells fantastic with all that melted beeswax.


A sort of patriotic drag queen group...


And this was my favorite--a map of the United States made out of 25,000 bottle rockets! The creators took chicken wire and stretched it on a frame, then slid the bottle rockets stick-first into it. (See the red color beneath the blue? Click on the image to see it larger.) And of course, later that night they lit it up! After the big BIG fireworks display, they tossed their creation onto the bonfire, and it went crazy. Awesome.


Best presentation of the night went, as it almost always does, to the glass studio. Last year, they popped out of a van and pretended to blow glass using a watermelon on the end of a metal tube. This year, they created a fire-breathing dragon using some of the propane they use to do smaller work outside the ovens. Then they worshiped the dragon with balloons on the ends of their blowing sticks where the glass would normally be. He breathed fire, snorted smoke bombs, and then popped all the helium in their balloons with mini-explosions! Nice stuff.


After the parade ended, we all settled in for nightfall to watch the big fireworks display. Another fun, creative year of Fourth of July celebrations with our friends at Penland. Yay for America!

Read more...

RIP Wooster the Rooster

>> Tuesday, April 20, 2010

A couple of days ago Jo and I came home to find feathers in our yard. A lot of feathers. I hoped that our hens were molting, but I had a bad feeling as Jo called in the chickens. Sure enough - only five showed up. Wooster - our handsome, gentle, protective, not-too-loud rooster was gone. We thought a hawk took him, but today we chased a coyote away from the remaining hens. Maybe he was coming back for seconds? I hate to do it, because they love free-ranging, but we're keeping the hens cooped up until we can come up with a safer situation for them. Their coop is big and has a run so it's not like they're in boxes, but I loved hearing them scratch around in the woods.

As for Wooster, Jo keeps saying things like, "I think he was a happy rooster. He had a good life." I think so too - and now is as good a time as any to share how he got his name. I thought we had shared this long ago, but a quick search of the archives says no. What an oversight!

So - shortly after we got the chickens Jo struggled to come up with names for them all. One day, as Alan and I were building the coop, she came out and announced that she had the perfect name. "Pecker! Because he pecks at me more than the others do." Jo does not like to be laughed at, so we struggled to keep straight faces while we explained that she needed to keep thinking. Her next option? "Cock! Because when he gets older he'll crow cock-a-doodle-doooooo!" Now, what are the odds that the first two names she'd come up with would both be so wildly inappropriate? We told her to keep thinking, and finally she came up with Wooster. "Because we like Jeeves & Wooster and Wooster rhymes with rooster." Good enough for me - Wooster it was.

RIP Wooster the Rooster.

Read more...

Our Chickens Are Afraid of Cheerios

>> Friday, April 9, 2010

Nothing - and I mean nothing - makes Jo happier than going outside, calling her chickens, and having them come running to her with their weird, rocking gait. She laughs out loud when they mill around her feet, and says things like, "Ladies! Ladies! Ha ha ha ha! I can't walk! Let me through or you'll never get your treat! Ladies! Ha ha ha ha ha!" I know they're just coming for the food, but it makes me as happy as it makes Jo.

Yesterday we tried to feed them some leftover Cheerios and milk. They LOVE milk - but the Cheerios really freaked them out. We put down the dish and they all came running over, then backed off - making concerned sounds and turning their heads sideways to get a good close look with one eyeball. They decided it was just too dangerous and started wandering away - but we called them back. I fished one Cheerio out of the milk and set it on the ground near the dish. Whew! Now it was safe! Freckles (the head biddy) gobbled it up, but still looked concerned about the whole dish with the weird, floating circles. I fished another one out and set it down - she ate that too. She finally decided the whole dish was safe and they all dove in - first eating all the Cheerios, then drinking down the milk. I wonder what they thought it was? Jo thinks they thought it was a many-eyed, shape-shifting monster.

Read more...

Six Chicks Are in Business!

>> Friday, February 26, 2010

 
I've spent a good bit of my free time this week helping Jo make some labels for her egg business. There's a Farmer's Market tomorrow (indoors, of course) and it'll be her first chance to sell to people besides friends and our favorite pizza restaurant. She drew lots of colorful chicken pictures (and a pretty buxom version of herself!) and chose her five favorites to represent our five hens. I scanned them and then GIMPed them together into labels for her egg cartons. A little busy - but cute, no?

She wanted Wooster (her rooster) in on the action too, but he's not a "chick" so he only got placement on one of her business cards. He is authentically noisy.


She's got a gallery of ten cards to choose from - she had a great time coloring all the chickens with the fancy new Prismacolor colored pencils she got for Christmas. She came to work with me one day and used the quality colored pencils there - and promptly asked if we could throw away the cheap ones at home and replace them with Prismacolor. What can I say?

So if you're local, come see us (and lots of other farmer's market favorites) tomorrow at Mountainside Wine on Upper Street in Spruce Pine. I really hope Oak Moon Creamery will be there - I want some of their orange goat cheese for my roasted beet salad!

Read more...

For the Birds

>> Monday, January 11, 2010

I've been meaning to put out bird feeders ever since we moved into the new house (a year ago now!) but I just got around to it the other day. Of course - we don't own any bird feeders, so Jo and I made a couple.


First up was the paper-towel tube feeder. Want to make your own? Spread peanut butter all over the outside of a paper towel tube and roll it in bird seed. Tie a length of twine (more than twice the length of the cardboard tube) around the center of a popsicle stick. Thread both ends of string through the tube so that the popsicle stick acts as a stopper at the bottom. Tie the ends in a knot and hang it outside.


We had to wait for an empty milk carton for the second one. Poke a hole through the top of a milk carton. Thread some string through it and tie it at the top for a hanger. Cut openings in opposite sides of the milk carton - not too close to the bottom - the seeds will only go up to the bottom of the opening. Poke holes an inch or so below each opening and thread a dowl through these holes. Fill with seeds, hang outside, and wait for the birds to find it.

No birds have found them yet. It's been so cold and windy out that I hope they're all hunkered down. I think I've seen one bird in the last week. One. Except for our chickens, of course. We did see one ENORMOUS opossum yesterday, walking down our driveway in the middle of the day. It was the biggest one I've ever seen - the size of a smallish dog. I wonder why it was out during the day. It certainly didn't look hungry.

Anyway, until I have photos of actual birds to show, I thought I'd leave you with this lovely wool bird from Cat's Miaow. Isn't he a cutie?


Read more...

HOW TO: Make a chicken waterer that doesn't freeze

>> Wednesday, December 16, 2009


The water in our chicken coop keeps freezing! What's a backyard poultry farmer to do? Build a homebrew chicken water warmer. Here's how we did it:


To start, you'll need a large tin coffee can, or something comparable. It just needs to be metal.


Next, buy an "Electric Water Pipe Freeze Protection Cable," also known as a "Pipe Heating Cable." These are supposed to be used for keeping exposed pipes from freezing. Our local Ace Hardware had a nice selection of lengths. For this project, you'll want the one that's just three feet long. Out of the box, they look like this:


 The black part is the heating cable.


The larger orange case is the thermostat, and the black circle is the sensor that must be touching whatever you need to keep warm. This Easy Heat model kicks on when the temperature falls to 38 degrees Fahrenheit, and warms the water until it reaches 45 degrees F. The documentation says it works down to -38 degrees. If that claim is ever tested, our chickens are going to have bigger problems than a frozen water dish.


The last thing you'll want is a tape that can withstand temperature extremes. The Easy Heat manual says electrical tape is fine, but we went fancypants and bought metal repair tape usually meant for duct repair. (*See EDIT, below.)


Lastly, you'll need a short cake pan. We chose a heart-shaped pan because we love our chickens. Also, it was getting rusty and we were going to throw it out anyway.


Wrap the heating element part of the cable around the can in a downward spiral, beginning about an inch from the top. Be sure that when you finish, the thermostat part of the cable isn't so low that it'll be sitting in your water. To make sure we didn't screw up, we put the can in the cake pan to help us eyeball it. Make sure the black circle that senses the temperature of the can sits as flat as possible against the can.


Tape down the end of the heating cable at the top, and then tape the wire in front of and behind the thermostat, to keep the thermostat from losing its contact.


Once we had all the ends taped down,we went back and added metal tape all along the cable. We figured this would make the connection more secure all along the heating element, and perhaps keep a bit of that heat focused inward, rather tan outward.


Using a hammer and a Philips-head screwdriver, punch a hole in the can near the height of the cake pan rim, but still below it. The hole is essentially your water line, as, through the miracle of science, the water inside the can will only pour out until the water level outside covers the hole. The same principle works in the dog and cat watering stations that use an upturned two-liter soda bottle.

For the hole punching, remember to put something on the inside to hammer against, or you'll just dent your can. The corner of a table you don't mind getting scratched works well.

To keep the electrical cord up out of the water (more for chicken accessibility than any worry about the wire in the water) we also ran the orange electrical cord straight back up the can and put a piece of tape on it to hold it there, but you can handle the cord in whatever way works best for your coop.

And that's it! It's time to fill up your new de-luxe, heated chicken waterer and plug it in. To fill it, remove the can from the cake pan and fill it up in the sink. Put the cake pan over the open mouth of the can (upside-down) and flip the whole thing over. Do this quickly, and right where you're going to be setting it down, just in case it sloshes. To our surprise though, this actually wasn't a messy affair.


We already had electricity running to our coop to power an incandescent bulb on a Christmas tree timer, both to keep our chickens warmer and to extend the chickens' daylight hours, which keeps our hens laying all winter long. (The tree timer is the green box hanging there in the picture; it clicks on at dusk, and can be programmed to switch off again a set number of hours later. We found ours at Target.) The only way to test this sucker was to plug it in out there in the cold and see if it kept the water from freezing, and darn if it didn't work! While our other waterers are frozen solid, the water in our No-Freeze Chicken Waterer is fresh and frost-free all day and all night long. (*See EDIT, below.)


Here's hoping your chickens stay warm and well-watered this winter!

*EDIT: First, don't use the silver reflective tape. The chickens will just eat it. (Our did, at least.) Instead, we've attached the heating cord with the duct joiners that tighten when you use a screwdriver on them. (Pics to come.) Second, the waterer still freezes at very low temperatures. I don't know an exact level, but if the temperature is even in the 20s, you'll still have an ice block. It still works right around freezing, but for anything much colder...ah, well. Back to the drawing board.

Read more...
Related Posts with Thumbnails
Read Alan's archived newsletters here.

Blog Archive

Swell Stuff

My Etsy Favorites

  © Blogger template Simple n' Sweet by Ourblogtemplates.com 2009

Back to TOP