The water in our chicken coop keeps freezing! What's a backyard poultry farmer to do? Build a homebrew chicken water warmer. Here's how we did it:
To start, you'll need a large tin coffee can, or something comparable. It just needs to be metal.
Next, buy an "Electric Water Pipe Freeze Protection Cable," also known as a "Pipe Heating Cable." These are supposed to be used for keeping exposed pipes from freezing. Our local Ace Hardware had a nice selection of lengths. For this project, you'll want the one that's just three feet long. Out of the box, they look like this:
The black part is the heating cable.
The larger orange case is the thermostat, and the black circle is the sensor that must be touching whatever you need to keep warm. This Easy Heat model kicks on when the temperature falls to 38 degrees Fahrenheit, and warms the water until it reaches 45 degrees F. The documentation says it works down to -38 degrees. If that claim is ever tested, our chickens are going to have bigger problems than a frozen water dish.
The last thing you'll want is a tape that can withstand temperature extremes. The Easy Heat manual says electrical tape is fine, but we went fancypants and bought metal repair tape usually meant for duct repair. (*See EDIT, below.)
Lastly, you'll need a short cake pan. We chose a heart-shaped pan because we love our chickens. Also, it was getting rusty and we were going to throw it out anyway.
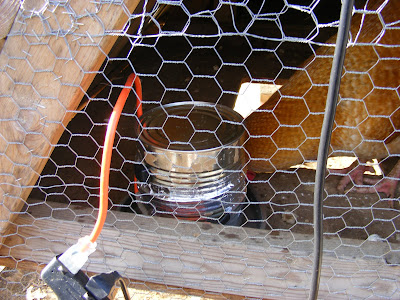
Wrap the heating element part of the cable around the can in a downward spiral, beginning about an inch from the top. Be sure that when you finish, the thermostat part of the cable isn't so low that it'll be sitting in your water. To make sure we didn't screw up, we put the can in the cake pan to help us eyeball it. Make sure the black circle that senses the temperature of the can sits as flat as possible against the can.
Tape down the end of the heating cable at the top, and then tape the wire in front of and behind the thermostat, to keep the thermostat from losing its contact.
Once we had all the ends taped down,we went back and added metal tape all along the cable. We figured this would make the connection more secure all along the heating element, and perhaps keep a bit of that heat focused inward, rather tan outward.
Using a hammer and a Philips-head screwdriver, punch a hole in the can near the height of the cake pan rim, but still below it. The hole is essentially your water line, as, through the miracle of science, the water inside the can will only pour out until the water level outside covers the hole. The same principle works in the dog and cat watering stations that use an upturned two-liter soda bottle.
For the hole punching, remember to put something on the inside to hammer against, or you'll just dent your can. The corner of a table you don't mind getting scratched works well.
To keep the electrical cord up out of the water (more for chicken accessibility than any worry about the wire in the water) we also ran the orange electrical cord straight back up the can and put a piece of tape on it to hold it there, but you can handle the cord in whatever way works best for your coop.
And that's it! It's time to fill up your new de-luxe, heated chicken waterer and plug it in. To fill it, remove the can from the cake pan and fill it up in the sink. Put the cake pan over the open mouth of the can (upside-down) and flip the whole thing over. Do this quickly, and right where you're going to be setting it down, just in case it sloshes. To our surprise though, this actually wasn't a messy affair.

We already had electricity running to our coop to power an incandescent bulb on a Christmas tree timer, both to keep our chickens warmer and to extend the chickens' daylight hours, which keeps our hens laying all winter long. (The tree timer is the green box hanging there in the picture; it clicks on at dusk, and can be programmed to switch off again a set number of hours later. We found ours at Target.) The only way to test this sucker was to plug it in out there in the cold and see if it kept the water from freezing, and darn if it didn't work! While our other waterers are frozen solid, the water in our No-Freeze Chicken Waterer is fresh and frost-free all day and all night long. (*See EDIT, below.)
Here's hoping your chickens stay warm and well-watered this winter!
*EDIT: First, don't use the silver reflective tape. The chickens will just eat it. (Our did, at least.) Instead, we've attached the heating cord with the duct joiners that tighten when you use a screwdriver on them. (Pics to come.) Second, the waterer still freezes at very low temperatures. I don't know an exact level, but if the temperature is even in the 20s, you'll still have an ice block. It still works right around freezing, but for anything much colder...ah, well. Back to the drawing board.


